Cooking up Natural Skin Care

Cooking up Natural Skin Care

You are likely wondering what I have been cooking lately. Well in the last year or so I promise I have been cooking! When I got pregnant with my daughter life started getting very busy, very fast, and my blogging took a hit. I am looking forward to finding the time again to share what I eat and encourage others to live healthfully.

During my pregnancy I felt very strongly about taking the best care of my body, both inside and out. I started to develop my own skin care products so I could benefit from all natural ingredients without any unwanted chemicals. I started with what I like to call the Original Oil, a simple blend of coconut oil, jajoba oil, and vitamin E.  Perfect ingredients for healthy and glowing skin in perfect proportions.  Since then I discovered the magical benefit of sweet almond oil and developed my all time favorite product, Almond Original Oil.  This can be used anywhere and everywhere; absorbs deep into your skin to fight wrinkles, aging, and dryness.

I started sharing my products and ideas with friends and got wonderful encouragement to branch out and start selling. I recently took the plunge and opened an etsy shop where I have all of my favorite items available for sale. Check out my shop and enjoy softer, brighter, healthier skin!


Maddy Grace Skin Care on ETSY


Healthy Date Nut Cookies

Healthy Date Nut Cookies

2015-02-08 10.20.07

I got this recipe from my sister when we were visiting a few months ago.  I believe she found the recipe on http://www.damndelicious.com.  She kept raving about how wonderful and easy these little cookies are to make, and she boasted that her 3 year old and 18 month old love them as well.  They are dairy free, gluten free, everything free so I was suspicious that they would be lumpy, dry, and tasteless.  They ended up being totally delicious and a true guilt free substitute for sugary, buttery, flour filled treats.  I have been playing around with mine adding various dried fruits, oatmeal, and seeds to make more of a granola bar as well, which is fabulous.  The recipe makes 8-12 cookies depending on size, so I usually double them as they get eaten very quickly.

2015-02-07 09.11.19

Ingredients:

-1 cups of pitted Medjool dates (11-12)
-1 1/2 cups of raw walnut halves
-1/2 tsp baking soda
-1/4 tsp salt
-1 tsp vanilla extract
-1 flax egg (1 Tbsp ground flax or chia seeds mixed with 3 Tbsp of water)
-Optional additions:
-1/3-1/2 cup of dark chocolate chips
-1/4 cup dried cranberries, cherries, or blueberries
-1/3 cup of old fashioned oats

Directions:

1. Preheat oven to 350F and prepare baking sheet by lining with wax paper.
2. Use food processor with “S” blade to process dates and walnuts until crumbled and mixed.

2015-02-07 09.19.59
3. Add salt, baking soda, vanilla, and flax egg using the pulse feature to not over process (I like the cookies a little chunky, but if you want a smoother consistency feel free to pulse longer).
4. Stir in any optional ingredients that are desired.

2015-02-07 09.37.23
5. Wet your hands and flatten out cookies to place on lined baking sheet (they won’t expand so they can be placed pretty close).

2015-02-07 09.34.012015-02-07 10.06.53

Plain followed by Chocolate and Cherry .

6. Bake for 12-14 minutes, until slightly golden brown, allow to cool on pan before transferring to a wire rack.

Serve warm or store in the fridge for up to a week.

Enjoy!

Red Wine Braised Oxtail

Red Wine Braised Oxtail

2014-12-14 19.01.41 
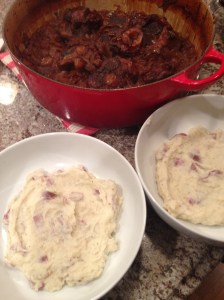
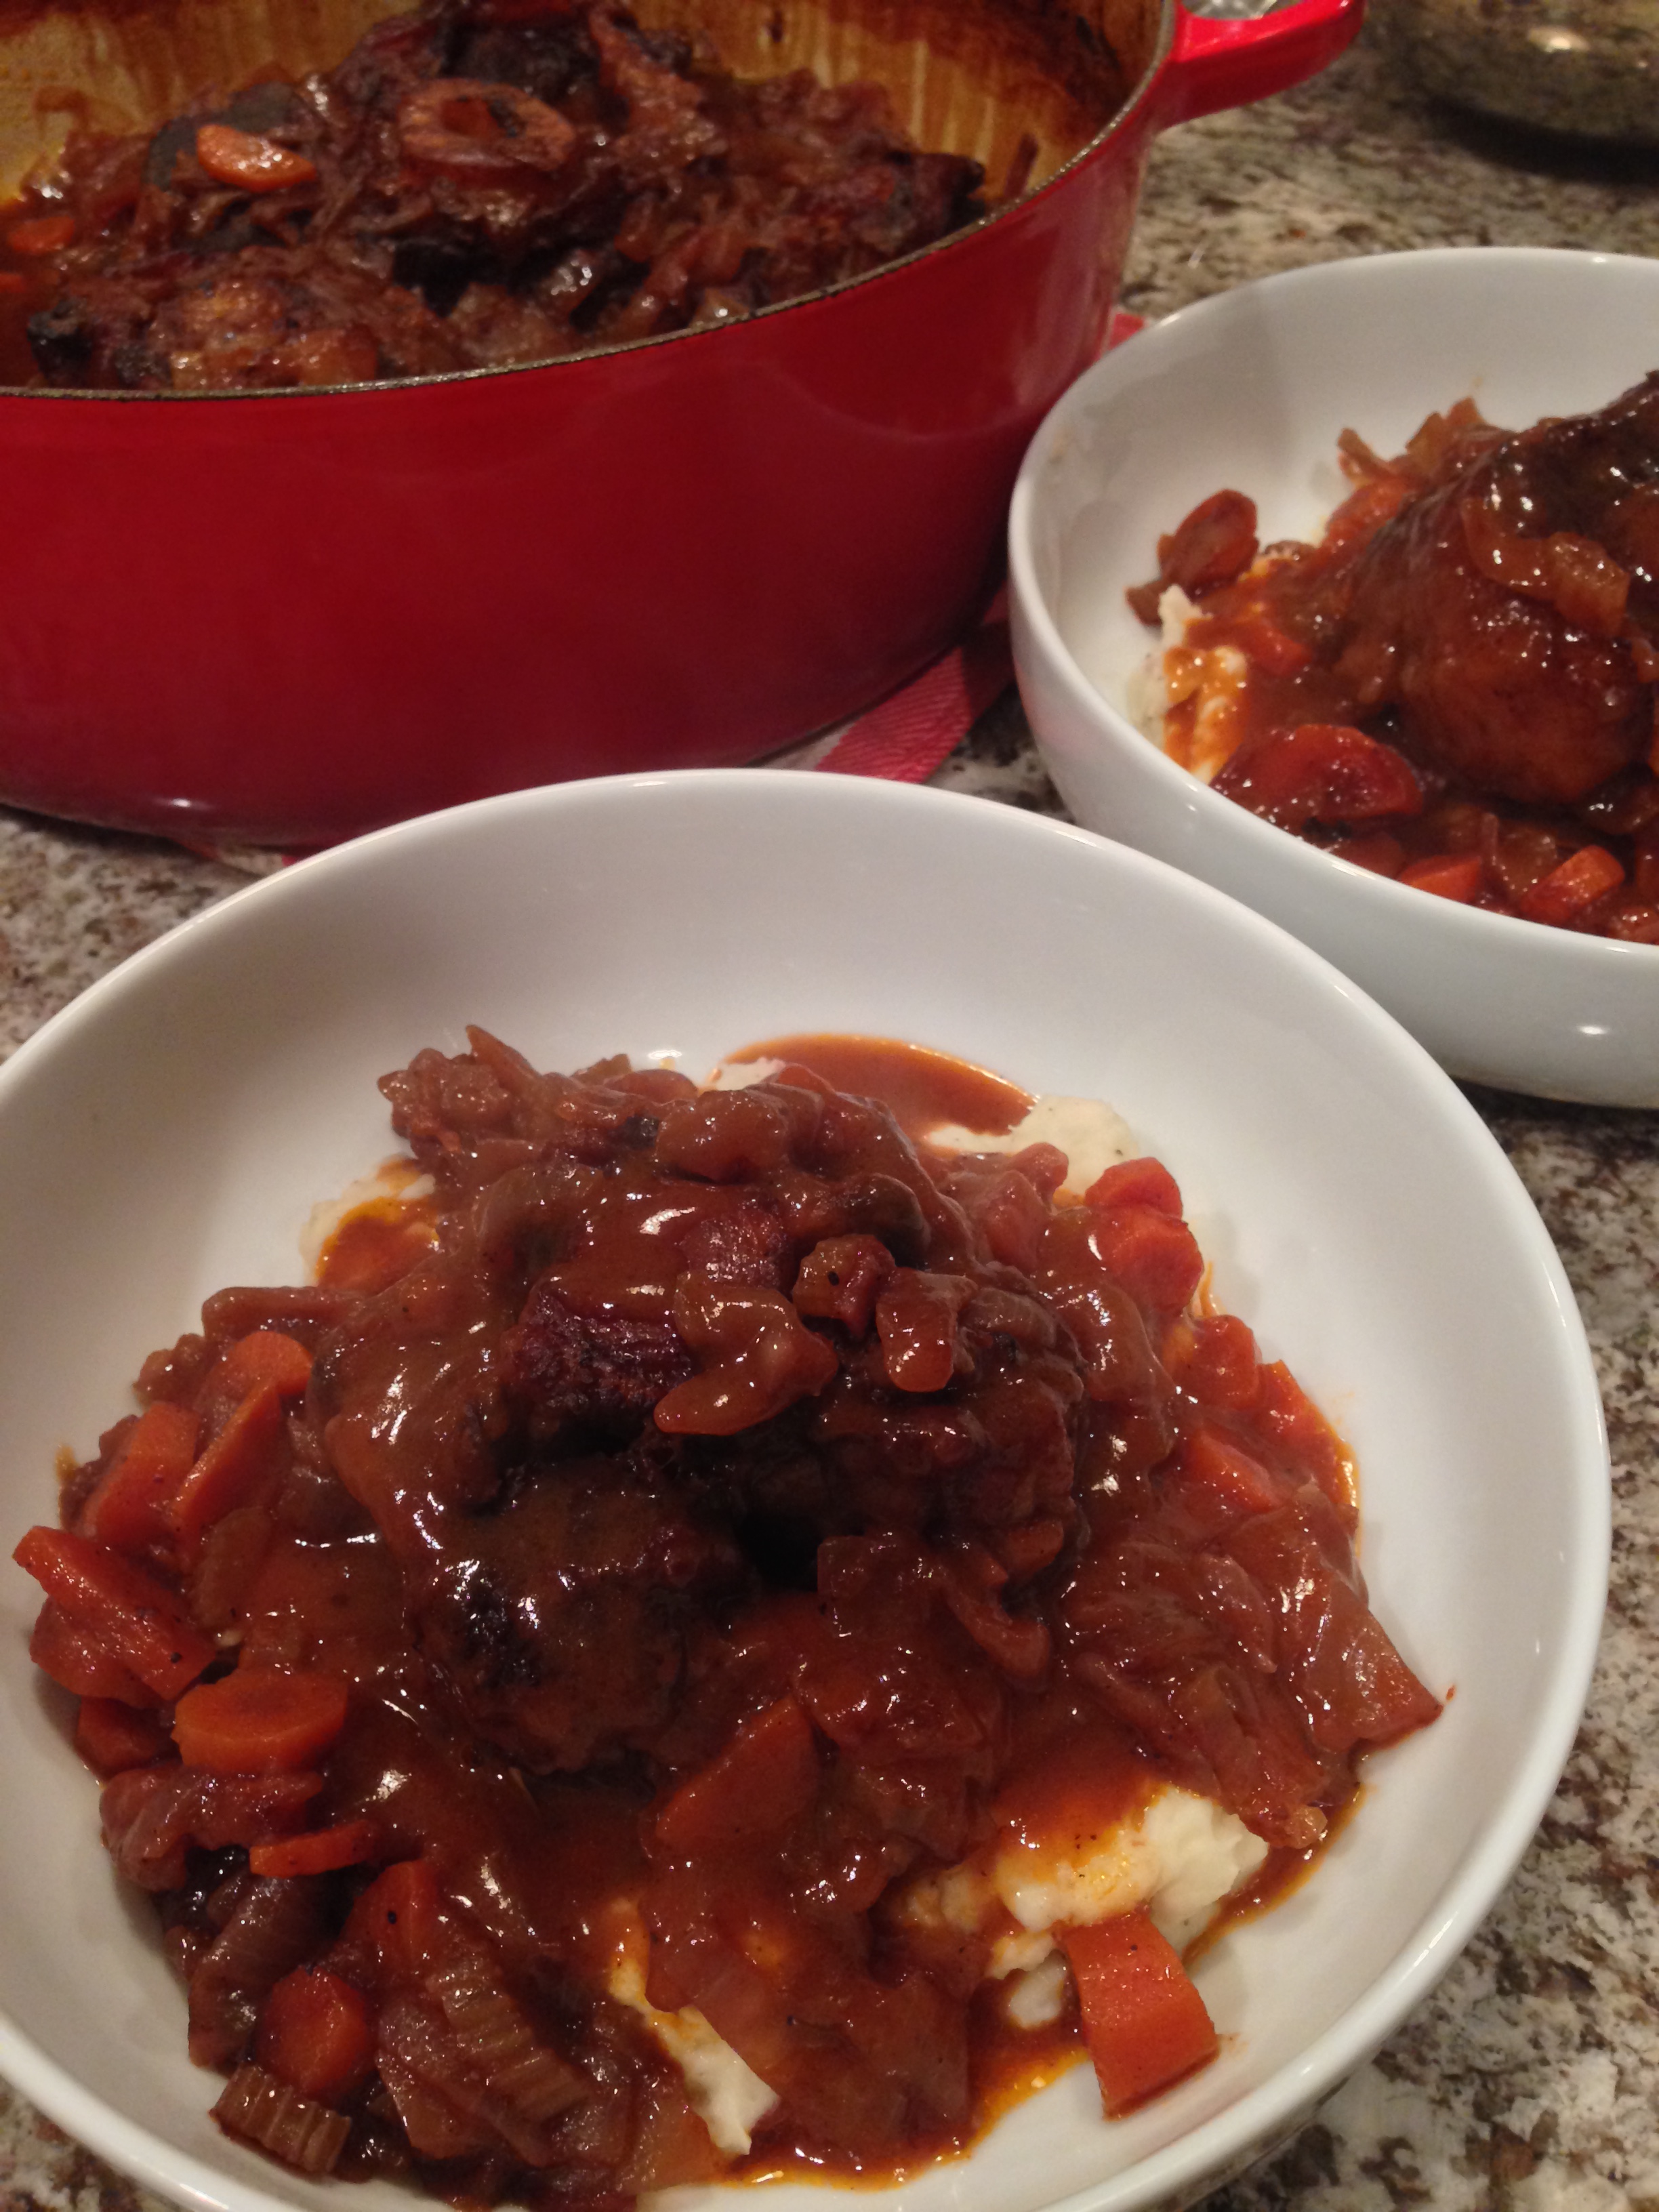
On a cold winter day, braised meat makes an ideal comfort food to warm your home and your belly.  I got turned on to oxtail several years ago after making an oxtail ragu with friends.  Recently I started buying this cut of beef again, and after a few tries I think I have perfected the recipe.  Oxtail is the relatively inexpensive tail of cattle skinned and cut into short lengths.  The meat has a large bony center with a gelatin rich core, excellent for making stock.  When cooked low and slow the meat will fall off the bone while the gelatin and fat will melt to make an amazingly flavorful and hearty meal.

2014-12-14 19.01.50

You will want to start this dish early in the afternoon to give it adequate time to develop flavor.  Braising is a simple but long process that yields delicious results with cheap cuts of meat.  One thing to keep in mind when braising any cut of meat is to use a wine that you enjoy drinking on its own, since the wine is such an integral part of the dish.  While at the market I was enticed by an even cheaper cut of beef along with the oxtail, the beef shank with bone, which I used in the dish with the oxtail.  I bought it because it basically looked like a larger piece of oxtail.  The friendly butcher at the Paulina Meat Market assured me it would braise beautifully.  He was right, I will definitely be buying and braising this cut again.

2014-12-14 14.35.53

Oxtail (left) and Shank with bone (right)

Previous times braising oxtail I did not bother to make a sauce out of the remaining juices, I just ladled the thin juices on top.  I found several recipes that recommend making a simple roux to thicken the liquid into a sauce, so I thought I’d give it a try.  It took an extra 5 minutes to make the sauce, but it was well worth the effort.  The sauce brought the dish to a whole new level, and if I do say so myself was better than anything I’ve eaten out in a while.

Ingredients:

-4-5 pounds of oxtail (I used 2 lbs of oxtail and 1 large shank of beef with bone)
-6 Tbsp butter, divided into 2 Tbsp pads
-2 large onions, diced
-3-4 large cloves of garlic, minced
-5 carrots, peeled and sliced
-2 stalks of celery, sliced
-1/4 tsp red pepper flakes
-Salt and pepper
-Garlic powder
-2 sprigs of rosemary
-3 bay leaves
-3 Tbsp tomato paste
-1 bottle of red wine
-4 cups of chicken or beef stock
-2Tbsp flour

Directions:

1. Season meat on both sides liberally with salt, pepper, and powdered garlic.

2. In a large dutch oven on medium heat melt 2 Tbsp of butter and brown meat on all sides.  Brown in batches to avoid over crowding the pan.

2014-12-14 14.46.19

3. Remove meat when browned and set aside.  Add onions to dutch oven and season with salt, up to 2 tsp of black pepper, and red pepper flakes.  Cook on medium/low heat with 2 additional Tbsp of butter until lightly browned.

4. Add garlic, carrots, and celery and cook on medium heat for 5 minutes before adding tomato paste.

2014-12-14 15.06.26

5. Add wine, broth, rosemary sprigs, and bay leaves returning heat to medium, simmer until liquid is reduced to nearly half.

2014-12-14 15.10.512014-12-14 15.13.07

6. Preheat oven to 325F.  Return meat to dutch oven with juices, bring to a simmer.  Cover with oven proof lid or cover tightly with foil.  Cook in oven for 3 to 3 1/2 hours.

2014-12-14 18.43.55

7. Carefully remove bay leaves and rosemary sprigs.  The rosemary will break off from the stem, which is fine.  Remove 2/3 of the liquid from dutch oven and spoon into a small pan to make a sauce.

8. To make sauce: soften remaining 2 Tbsp of butter and mix with 2 Tbsp of flour to make a roux, stir into hot liquid to thicken into a sauce over medium heat for a few minutes to desired consistency.

2014-12-14 18.53.21

9. Serve over a bed of creamy mashed potatoes.

2014-12-14 18.59.45

Enjoy!

Butterscotch Peanut Butter Fudge

Butterscotch Peanut Butter Fudge

2014-12-07 16.40.57

The holiday season is full of sweet treats, cookies, cakes, candies, and of course, fudge.  A small piece goes a long way when it comes to fudge, and this butterscotch version is no exception.  Butter is in the title, twice, so you know it’s good. The other great thing about fudge is that it is incredibly easy to make.  This is a recipe that my mother has been making for as long as I can remember.  I pressed chopped walnuts on top, but you can make them nut free, or mix the nuts into the fudge if you like.  I promise you will not be disappointed as this creamy fudge melts in your mouth.  I made this over the stove top, but you can zap the ingredients in the microwave for an even faster process if you .

2014-12-07 10.04.10

Ingredients:

1-12oz bag of butterscotch chips
1/2 cup of peanut butter
1-14oz can of sweetened condensed milk
1 tsp vanilla extract
1/4 cup of chopped walnuts

Directions:

1. Pour chips into a glass bowl and place over a pot of boiling water to melt the chips.  This will allow the ingredients to melt without risking being burnt in the bottom of a pain that is on direct heat.

2014-12-07 10.05.23

2. When chips are melted and thick, add the rest of the ingredients (except walnuts if planning to press into the top) and mix well until smooth and melted.  The mixture will be very thick, do not overheat.

2014-12-07 10.30.53

3. Pour into a 8×8 or 6×8 glass or metal dish.  If adding walnuts to the top, pour on top and press down into fudge to secure.

2014-12-07 10.33.18

4. Place in refrigerator for at least 12 hours to cool and set before cutting.  Keep in refrigerator for 1-2 weeks.

Bison Stuffed Acorn Squash

2014-11-01 19.51.27

As a kid my mom used to stuff squash with meatballs and bake them to make a complete meal in one self contained dish.  She was really onto something.  I have been making these little numbers for years, using my mom’s meatball recipe.  You can use any squash of your choosing, butternut, acorn, spaghetti, etc.  I decided to mix the meatball recipe up a bit when I found some good looking ground bison at the grocery store.  To enhance the fall flavor of the squash the bison was perfect.  I used rounded out the meatball with leeks and fennel.  The result was delicious!  I used 2 pounds of meat and was able to stuff 2 full acorn squash (4 halves) and 2 green peppers.  I don’t like to use bread crumbs in my meatballs, so these are paleo friendly.

2014-11-01 19.53.36

Ingredients:

-2 Acorn squash, halved and seeded.
-2 Green bell peppers, stem and core removed
-1 lb sausage (I used a spicy sausage)
-1 lb ground bison meat (you can use ground beef or turkey if bison isn’t your thing)
-1/2 tsp ground black pepper, heaping
-1/2 tsp celery salt
-1 tsp garlic powder
-1 tsp dried thyme, heaping
-1 tsp dried sage, heaping
-1/4 tsp red pepper flake
-1 leek quartered and sliced
-1/2 fennel bulb, diced

Directions:

1. Wash and prepare the squash and green peppers.

2. Mix together the meatballs by adding sausage, bison, seasonings, leeks, and fennel.

2014-11-01 18.16.14

3. Stuff meat mixture into center of squash and green peppers, arrange on a baking sheet.

2014-11-01 18.16.02

4. Bake in preheated oven at 350 degrees for 1 hour (more or less, until meatball is cooked through).  Half way through cooking time I brushed some of the drippings around the top of squash to prevent drying.  You can also rub with oil or butter.

2014-11-01 19.51.02

With this dish I eat the skin of the squash as it gets soft with baking.  If you want you can serve with a small salad for a very healthy and delicious dinner!  A thick piece of toasted bread with goat cheese is also nice with this dish.

Don’t throw away the seeds from the squash, you can season and bake these as well to eat alone or toss onto a salad.  I seasoned mine with salt, pepper, and garlic.

2014-11-01 17.53.42

Bake at 350 for 15 minutes (more or less for desired browning/crisp)

2014-11-02 12.58.25

Enjoy!

Roasted Sweet Potatoes

2014-09-23 20.10.04Sweet potatoes are a nutritious fall treat.  Rich in dietary fiber, vitamins A, B, and C it makes for a great side dish to any meal.  The starchy goodness is complimented by subtle sweetness that really takes off when highlighted the right way.  I got 3 pretty big sweet potatoes in our CSA this week that I knew I couldn’t eat all by myself, so I had to find a way to disguise them into something my husband would eat.  Roasting the potatoes is an easy way to cook them, and it brings out the natural sweetness in the vegetables.   I also learned that baking sweet potatoes increases the Vitamin C content, go figure.  To sweeten I debated between using my traditional go-to brown sugar or maple syrup.  I went the maple syrup route as I keep hearing it is the new “healthy sugar” of choice.

I am not a fan of going full-sweet when making dinner sides, so to keep the savory touch I roasted with leeks and put a few sprigs of thyme on top. Usually, I remove thyme from the stem and stir it into my dishes, but I so often see in recipes that the thyme is used whole to add flavor then removed.  Sometimes the small leaves become bitter while roasting, so I kept the stems attached and removed the sprigs just prior to eating.  I was surprised at how the flavor incorporated so well without actually remaining in the finished product.  To round out the flavors I mixed in a few dashes of ground ginger.  This side smelt like thanksgiving while roasting, maybe it will make an appearance on the thanksgiving table this year.

2014-09-23 18.51.08

Ingredients:

-2 Large Sweet Potatoes, washed and diced with skin on
-1 large leek, diced into 1/2-1″ pieces
-2 Tbsp of oil (I used grape seed oil, you can use whatever you prefer)
-salt and pepper to taste
-2-3 dashes of ground ginger
-2-3 Tbsp of high quality maple syrup
-3-4 sprigs of fresh thyme

Directions:

  1. Prepare potatoes and leeks and place into oven safe dish.  Drizzle with olive oilthen season with salt, pepper, and ground ginger.
  2. Mix well then place sprigs of thyme on top, drizzle with maple syrup and an additional dash of salt.
  3. Roast in the oven at 400F for 45 minutes or until potatoes are fork tender, stir once during roasting.
  4. Remove thyme sprigs after cooking.

2014-09-23 20.10.16

Enjoy!

Hot Giardiniera

2014-09-10 20.08.33
Giardiniera is a blend of vegetables that are pickled and can be eaten as an antipasto or used as a condiment.  This recipe is one I got from my mom years ago and have really grown to love.  It takes some prep work and you are a few days away from the finished product, but believe me it is well worth the efforts.  When you make a giardiniera using hot peppers like this recipe, it is also called “Chicago Giardiniera”, typically eaten on Italian beef sandwiches.  We eat it liberally on sandwiches, wraps, sausages, spaghetti squash, over eggs, or even on its own.

2014-09-11 18.47.17

I have experimented in the past with hot water canning this giardiniera to preserve it for months.  This is a little risky as I do not have a recipe for timing the cooking or canning of this recipe to kill of all the bacteria, so I do not feel comfortable sharing a method at this time.  I suggest keeping the giardiniera in the fridge and using it up in a few weeks to a month.  The vinegar is preserving to allow the vegetables to stay fresh in the fridge for quite a while.

The oil you use should be picked based on flavor, so pick a high quality.  Know that the oil will solidify slightly in the fridge, so let it sit out a few minutes before eating.  If you want to lighten up the recipe a little, I would suggest using a grape seed or avocado oil in place of olive oil.  The recipe makes a significant amount, 6-8 pints, based on how quickly you will consume it may be wise to plan to share or half the recipe below.

2014-09-07 16.08.13

Ingredients:

2 green bell peppers, diced
2 red bell peppers, diced
8 fresh jalepenos, sliced
1-2 other hot peppers of choice
3 large celery stalks, sliced
3 medium carrots, diced
1 large onion, chopped
2 cups fresh cauliflower florets, diced small
1/2 cup salt
water to cover
2-3 cloves garlic, freshly minced
1 tbsp dried oregano, heaping
1 tsp red pepper flakes
1/2 tsp black pepper
1-5oz jar green olives, sliced (if desired)
1 C white vinegar (pickling or white wine)
1 C olive oil (or avocado or grape seed oil work well also)

Directions:

  1. Place the prepared peppers, celery, carrots, onion, and cauliflower into a large bowl that is able to be sealed or covered.  Stir in salt and fill with cold water until vegetables are covered.  Cover bowl and place in fridge overnight.2014-09-07 17.07.16
  2. The next day, drain salty water and rinse vegetables well.
  3. In a bowl mix garlic, oregano, red pepper flakes, black pepper and olives.  Pour in vinegar and oil, mix well to combine with vegetables. 2014-09-08 19.40.58
  4. Cover and refrigerate for 2 days before use.

I typically package the giardiniera into pint or cup sized mason jars immediately after mixing, however you can return mixture to the original large bowl and seal in the fridge for 2 days before distributing into easier to manage jars or containers.

2014-09-10 20.01.35

Enjoy!

Healthy Pumpkin Pie Smoothie

2014-09-08 19.52.53

When it comes to exclusively fall foods, pumpkin is one that certainly comes to mind.  No other time of year do I want to ingest a Jack-o-lantern, let alone crave it.  There is something so indulgent but at the same time healthy.  Pumpkin is a type of squash full of vitamins (A,B,C, and K) and minerals.  The flavor is distinct but it is easily used in seasonal drinks, desserts, and now healthy smoothies.  I feel like I’m playing a trick on my body with this treat because it tastes so good but is really good for me.

I used my Vitamix blender to get the rich and velvety quality of the smoothie, in just 45 seconds of blend time you have guest pleasing dessert…or breakfast if you desire.

Ingredients:

-1/2 cup of pumpkin puree (not pie filling)
-1/2 cup of almond milk or coconut milk (I mixed the two 50/50)
-1 frozen banana
-1/4 tsp cinnamon powder
-1/4 heaping tsp of pumpkin pie spice
-1/2 Tbsp of vanilla extract
-1 Tbsp maple syrup (I used a grade B syrup with rich flavor, you can use agave or brown sugar here too)
-1 Tbsp chia seeds (optional)

Directions:

Place all ingredients into the Vitamix blender and slowly increase speed to high, blend for 45 seconds.  Add more milk if needed for consistency.

2014-09-08 19.53.44

Note:

-If you don’t have your banana frozen, put it in fresh and add a small handful of ice, you may need more milk when doing this.

-To make this more of a breakfast treat, try adding 1/4 cup of rolled oats or sprinkle with flax seed.

-Top with whipped cream and a sprinkle of nutmeg if serving for dessert.

Heirloom Tomato Simple Side

2014-09-07 10.59.31

Heirloom tomatoes are about to be finished for the season, but if you can get your hands on one I would highly recommend it.  A good tomato can stand alone on my plate, but sometimes it is nice to dress it up a little.  For a simple side we have been eating this summer I slice the tomato into big slices and dress it up a little.  It doesn’t get much easier or healthier.

I love the way basil matches with tomatoes, but don’t feel like you have to stop there.  I love chives when serving with a savory breakfast as pictured above or parsley when accompanying a sandwich.

Ingredients:

-1 heirloom tomato sliced thick
-1 Tbsp of good quality olive oil
-dash of Kosher salt
-1 Tbsp of fresh herbs roughly chopped or torn

Directions:

Arrange tomato slices on a plate and drizzle with olive oil.  Next sprinkle with herbs and kosher salt…done!

2014-09-07 10.41.01

2014-09-07 10.44.02

Smoker Cooking the Summer Away.

I have had a lot of remarks lately about my drop in posts this summer.  I do apologize, I have been doing some very simple cooking that I either haven’t found the time for, or just haven’t found “post worthy”.  Another major factor is that my husband and I bought an electric smoker this summer.  We have been smoking a lot of meat and fish on Sunday that we then eat in various meals during the following week.  Most people are not smoking meats at home and I felt this would have really limited my readers ability to recreate these meals.  We went the electric route with our smoker given the limited space on our balcony.  Going electric with the Masterbuilt Smoker was also a great call for us personally as the temperature remains consistent and the smoke output is limited…great for condo living.

2014-06-22 14.07.33

2014-06-22 14.10.04

2014-07-06 13.28.31

We have fallen in love with this method of cooking for the summer.  I love how easy it is to make a protein that can last all week but still has the ability to make a new meal every night.  As the fall approaches I will be reverting to more traditional methods of cooking and will be increasing my posts.  The recipes I made with smoked protein this summer I am sure to be making and posting with traditionally cooked proteins through the Fall and Winter, so don’t feel like you missed out on much!

Here are just a few of the meals I did capture on camera this summer with smoked proteins:

2014-06-15 10.28.12
Smoked salmon on a bagel with cream cheese, tomato, and chives.

2014-07-27 18.40.20-2
Homemade Ramen with smoked pork (I will definitely be making this again to post).

 2014-06-22 19.10.27
Fresh salad with smoked salmon filet and tangy herb vinaigrette.

2014-05-18 19.25.10
Smoked brisket with a side of red coleslaw.

If you are in fact interested in the marinades, rubs, or woods we utilized for smoking meats this summer please leave a comment and I can provide this for you.  Otherwise, get ready for Fall and all the delicious soups, roasts, and hearty sides that come with the season!

Pumpkin Spice Latte

SeasonsForCooking

2014-09-07 08.50.50

On the weekends we like to make the most of our Breville Barista Express, making what we consider a latte.  We bought it as a Christmas present for ourselves last year and have not been disappointed with the purchase.  It has even turned us into bean snobs, right now we only order in beans from Brooklyn.  You can taste the difference and the grind is so much better than any bean from Starbucks.

2013-09-29 14.23.28
With a little crisp of Fall in the air I wanted to make the ever famous Pumpkin Spice Latte.  I browsed a lot of recipes online before settling with these proportions below.  I tried to make it both healthy and light in flavor as I don’t enjoy feeling like I’m drinking the uncooked filling of a pumpkin pie.

Ingredients: 

– 1 cup almond milk, unsweetened

-1 cup of coconut milk (from a can, I like Trader Joe’s…

View original post 201 more words

Quick Pickled Corn on the Cob

2013-07-08 16.51.09

Pickled corn on the cob has become a summertime favorite at our house.  With corn in season it’s the best time to make this side.  I first made it from a recipe from Martha Stewart’s Real Simple magazine when we were eating fresh oysters at home.  I wanted to make something fresh and tangy that would stand up well and pair with the most delicious oysters in the world, Island Creek Oysters!

IMG_4092

This recipe is easy and I have added other vegetables to the mix over my times making it.  Some of my favorite additions are cauliflower, carrots, garlic, celery and fennel.

2014-07-01 22.00.03

You want to make this 2 days before you plan on serving it, and eat it within one week of making for the best results.  The chili peppers give a little kick, you can add more or less based on your preference.  I usually add an extra bay leaf or two as well for a little extra spice.  The vegetables are fantastic on their own, but I highly recommend adding the red onions to burgers, sandwiches, and fish tacos.  The sliced corn is great as well in the fish tacos, salads, or with fresh cilantro and tomatoes for a quick salsa.

Ingredients: 

4 ½ cups cider vinegar
6 cups water
¾ cups Sugar
¼ cup coarse salt
1 dried bay leaf
7 red Thai chilies, 3 split open
8 large ears of corn, shucked and cut into 1.5″ medallions
1 large red onion, thinly sliced

Directions:

1. Bring vinegar, water, sugar, salt and bay leaf to a boil making sure sugar dissolves.  Stir in chilies and let cool about 10 minutes until warm.

2014-07-01 21.48.12

2. Cut and prepare corn and onion (or whatever vegetables you want to use) and layer in jar or bowl.

2014-07-01 21.44.22

3. Pour warm vinegar mixture over corn and onion and cover completely leaving jar open for an hour or two to cool before closing and putting in refrigerator for at least 1-2 days.

Serve cold and enjoy!


Kohlrabi Salad

2014-06-29 15.46.43

If you have ventured through the farmers markets lately or joined a CSA, you are probably looking at a few bulbs of Kohlrabi to use up.  The first time I tried kohlrabi I grilled it with onions, garlic, salt and pepper.  It turned out good but nothing to rave over.  My friend suggested just eating the slices raw with olive oil and salt/pepper to taste.  She was right, raw is the way to go with this.  The flavor is similar to broccoli stem or cabbage, but more delicate.  This simple salad uses up these strange looking orbs in a fresh way.  I didn’t fully skin the bulbs before thinly slicing, but I did scale down some of the thicker portions of the skin to avoid any woody or tough pieces in the salad.  The leafy greens are edible too, I plan to pulverize those in my morning smoothie.

2014-06-29 15.05.55

Ingredients:

1-2 bulbs of kohlrabi cleaned and sliced thin
1/2 red onion, diced
1 handful of fresh herbs (I went with parsley and thyme)
1-2 Tbsp of good quality olive oil
Generous dashes of salt and pepper to taste

Directions:

1. Slice the kohlrabi, onion, and herbs.  Mix in a large bowl with olive oil and salt/pepper until evenly coated.

Note: If you want to take it up a notch, some crumbled feta and bacon would be delicious mixed in as well.

Pork Rub

2014-06-29 12.33.57

A smoker is to summer as the crock pot is to winter.  Slow and low cooking of affordable meats yielding moist and delicious results.  Whether you choose to smoke over coals or go the electric route as we have, you are in for a treat.  Our outside setup has driven us the electric route, and we have not been disappointed over the ease and quality of results.  It is now part of our regular Sunday routine, making enough meat or fish to eat for lunch and dinner all week long.  Today we are smoking a pork shoulder-butt with a homemade rub.  I wanted to share this rub recipe as it is easy and flavorful for a summer of grilling or smoking.  Starting out a little spicy and salty there is a hint of sweet that is perfect for pork.

2014-06-22 14.07.33

Ingredients: 

2 Tbsp Paprika (hot or sweet based on preference, I used a mix of the two)
1 Tbsp ground Black Pepper
1 Tbsp Garlic Powder
1 Tbsp Onion Powder
1 Tbsp Cayenne Powder
2 Tbsp Kosher Salt
1 1/2 Tbsp Brown Sugar

2014-06-29 12.40.10

Directions: 

Mix all ingredients together and use liberally over meats 20-30 minutes before cooking.

2014-06-29 12.36.33

Dill Potato Salad

2014-06-24 18.16.36

Summer is all about salads, and potato salad is no exception to the list.  While I love a healthy and fresh salad devoid of cheese and creamy dressing, sometimes a little creamy potato salad is just what the meal needs.  Especially when you are serving a main course straight off the grill.  I have an abundance of dill left over from our CSA this weekend and I needed a side to bring to dinner tomorrow night.  Potato salad is the best crowd pleaser I could come up with.  I started with a simple base and a combination of yukon and red potatoes to make this creamy and tangy masterpiece.  With the 4th of July coming up, I would recommend this as an easy and cost effective side.

Ingredients: 

3-4 medium size red skin potatoes
2 medium size yukon or golden potatoes
1/2 cup of mayonnaise
2-3 Tbsp light cream
1/4 cup of red onion, diced
1/4 cup of green onion, sliced green and white pieces
1/4 cup of dill, minced
1 Tbsp lemon juice
salt and pepper to taste

Directions: 

1. Bring the potatoes to a boil, whole, let boil for 10 minutes.  Remove from heat and allow to sit for 5-10 more minutes until just fork tender but not completely cooked.

2. In a bowl combine mayonnaise, cream, red and green onion, dill, lemon juice and salt and pepper to taste.

3. Drain and dice potatoes into 1-1 1/2 inch cubes based on preference.  Allow to cool and mix with mayonnaise mixture.  Serve that day or refrigerate for up to 2 days.

2014-06-24 18.12.23

Note: You may want to change out the dill for another herb of choice, but I think the dill is perfect.  You can also add some diced bacon for a meat lovers option, I think this is called German Style.  If you notice the potatoes absorb all the moisture on day 2, make up a little more mayo mix and add to potatoes.

Enjoy!