Roasted Sweet Potatoes

2014-09-23 20.10.04Sweet potatoes are a nutritious fall treat.  Rich in dietary fiber, vitamins A, B, and C it makes for a great side dish to any meal.  The starchy goodness is complimented by subtle sweetness that really takes off when highlighted the right way.  I got 3 pretty big sweet potatoes in our CSA this week that I knew I couldn’t eat all by myself, so I had to find a way to disguise them into something my husband would eat.  Roasting the potatoes is an easy way to cook them, and it brings out the natural sweetness in the vegetables.   I also learned that baking sweet potatoes increases the Vitamin C content, go figure.  To sweeten I debated between using my traditional go-to brown sugar or maple syrup.  I went the maple syrup route as I keep hearing it is the new “healthy sugar” of choice.

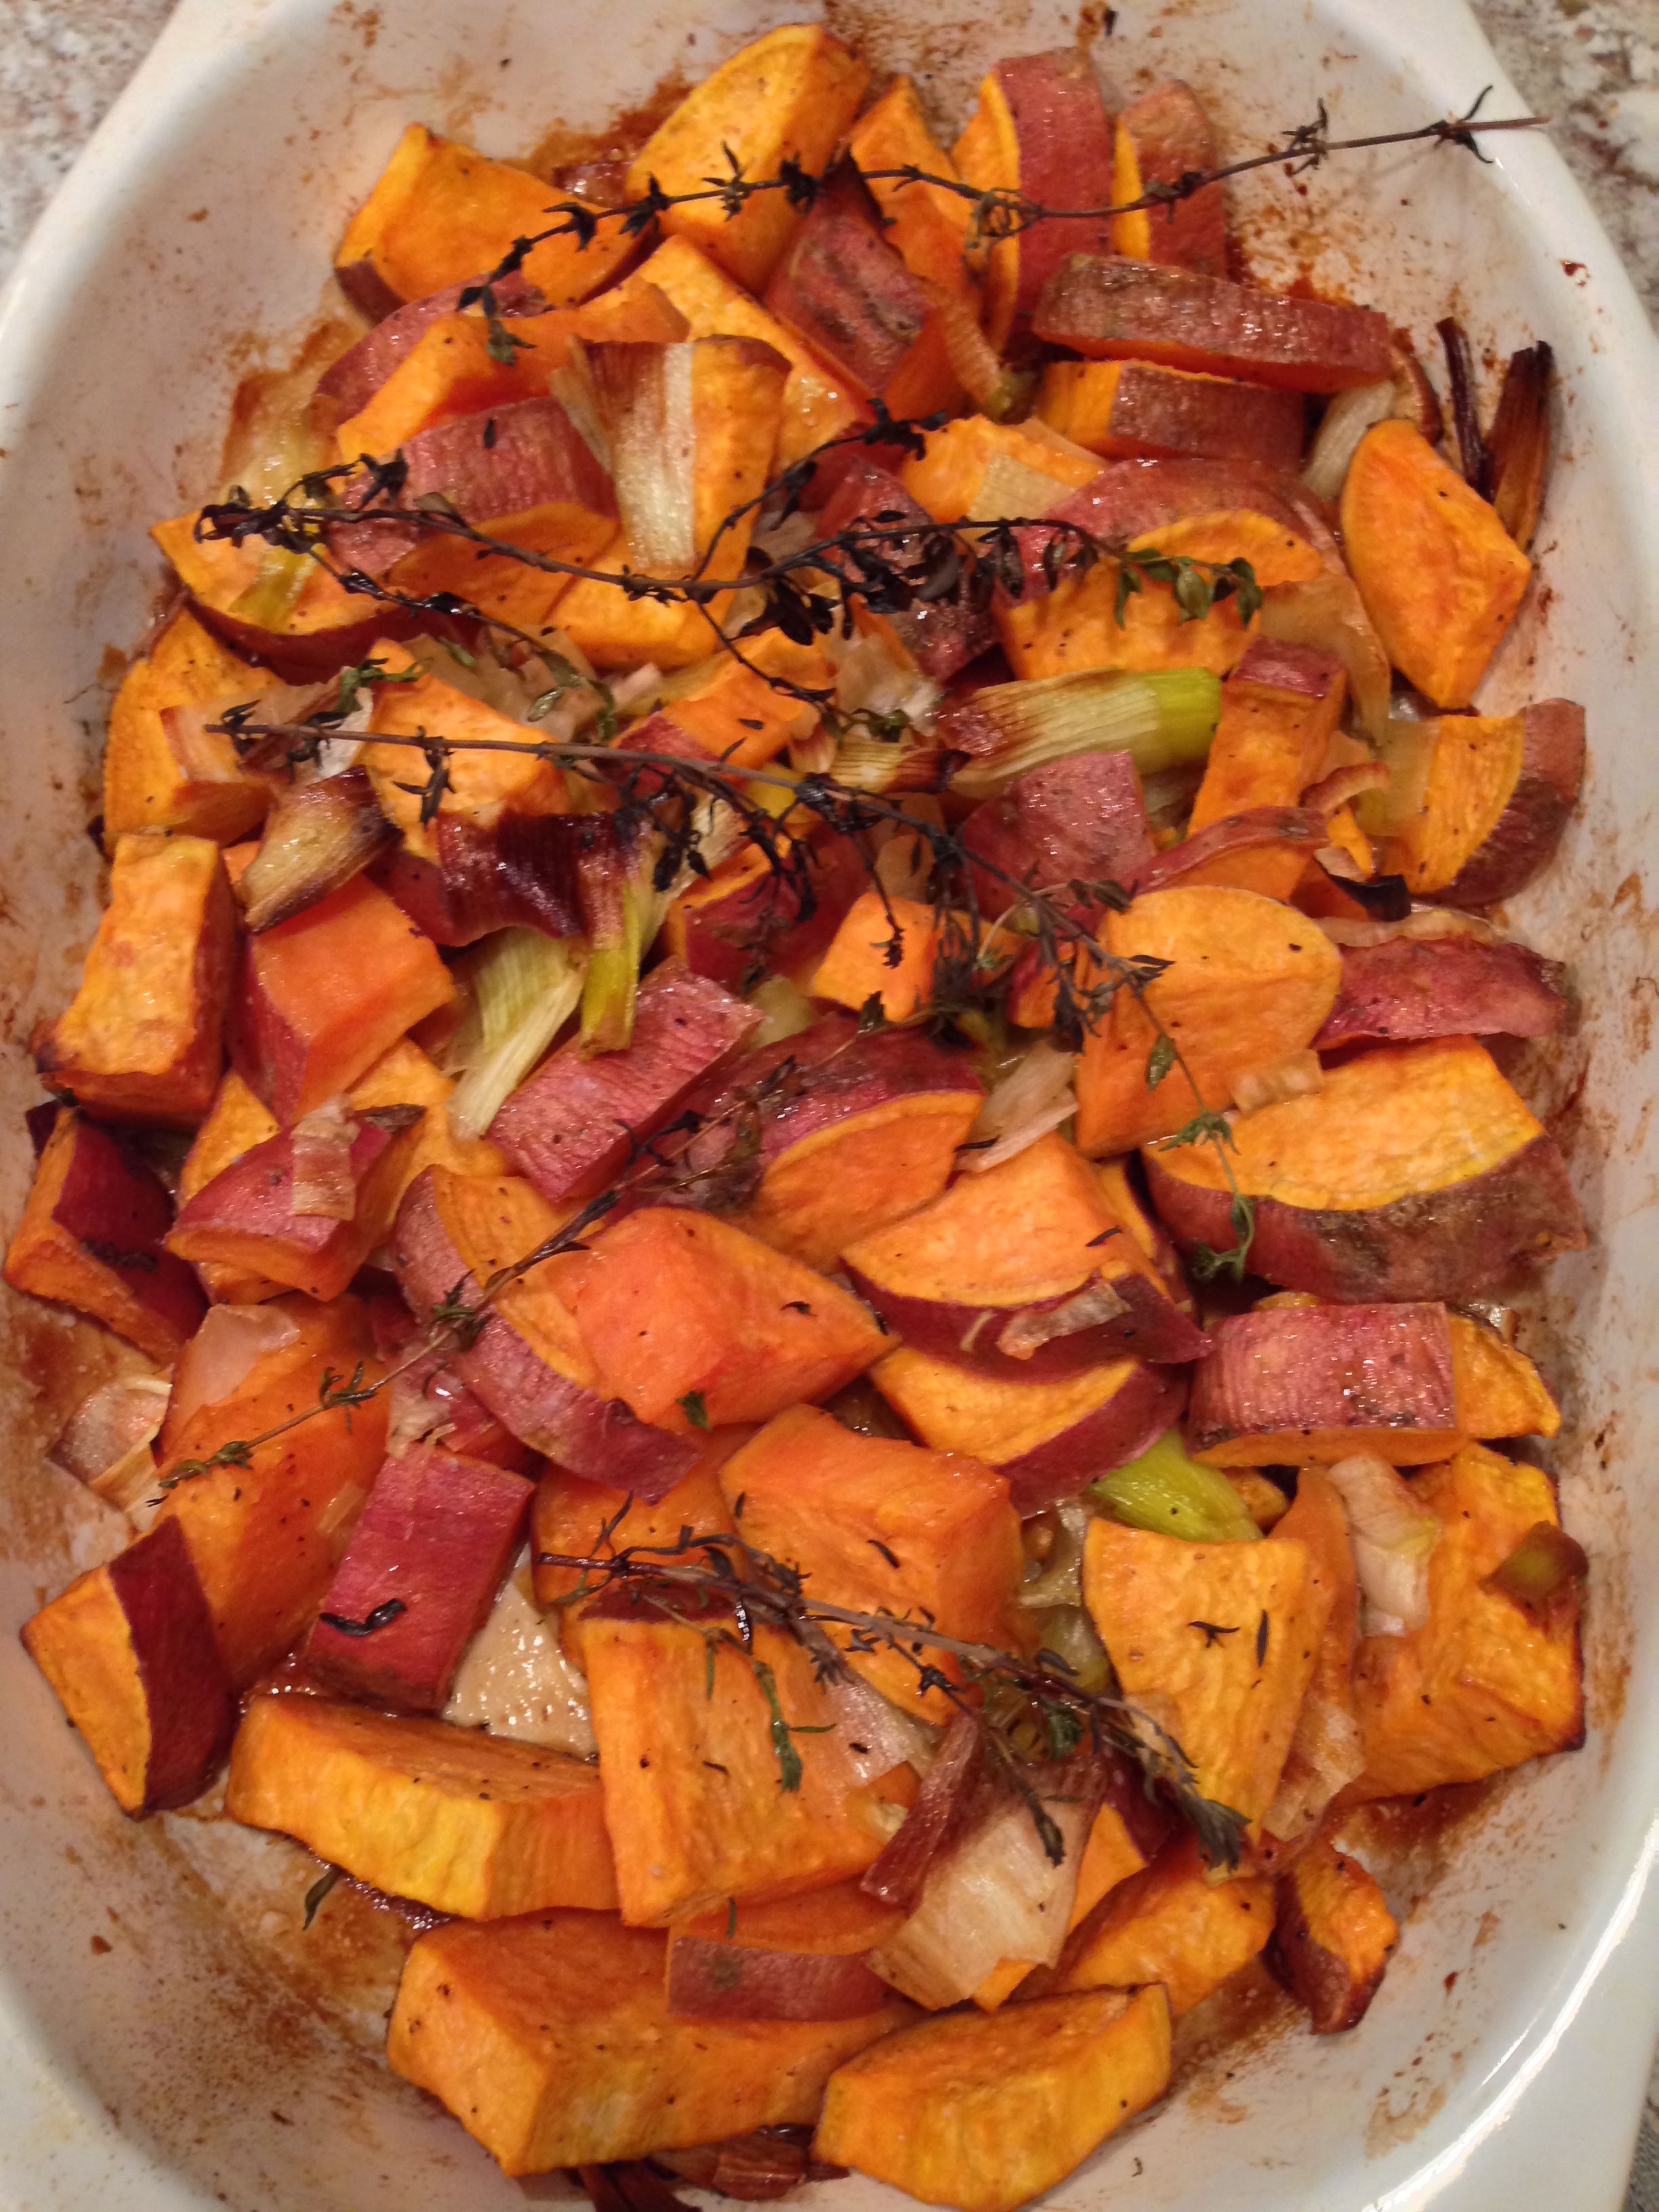
I am not a fan of going full-sweet when making dinner sides, so to keep the savory touch I roasted with leeks and put a few sprigs of thyme on top. Usually, I remove thyme from the stem and stir it into my dishes, but I so often see in recipes that the thyme is used whole to add flavor then removed.  Sometimes the small leaves become bitter while roasting, so I kept the stems attached and removed the sprigs just prior to eating.  I was surprised at how the flavor incorporated so well without actually remaining in the finished product.  To round out the flavors I mixed in a few dashes of ground ginger.  This side smelt like thanksgiving while roasting, maybe it will make an appearance on the thanksgiving table this year.

2014-09-23 18.51.08

Ingredients:

-2 Large Sweet Potatoes, washed and diced with skin on
-1 large leek, diced into 1/2-1″ pieces
-2 Tbsp of oil (I used grape seed oil, you can use whatever you prefer)
-salt and pepper to taste
-2-3 dashes of ground ginger
-2-3 Tbsp of high quality maple syrup
-3-4 sprigs of fresh thyme

Directions:

  1. Prepare potatoes and leeks and place into oven safe dish.  Drizzle with olive oilthen season with salt, pepper, and ground ginger.
  2. Mix well then place sprigs of thyme on top, drizzle with maple syrup and an additional dash of salt.
  3. Roast in the oven at 400F for 45 minutes or until potatoes are fork tender, stir once during roasting.
  4. Remove thyme sprigs after cooking.

2014-09-23 20.10.16

Enjoy!

Hot Giardiniera

2014-09-10 20.08.33
Giardiniera is a blend of vegetables that are pickled and can be eaten as an antipasto or used as a condiment.  This recipe is one I got from my mom years ago and have really grown to love.  It takes some prep work and you are a few days away from the finished product, but believe me it is well worth the efforts.  When you make a giardiniera using hot peppers like this recipe, it is also called “Chicago Giardiniera”, typically eaten on Italian beef sandwiches.  We eat it liberally on sandwiches, wraps, sausages, spaghetti squash, over eggs, or even on its own.

2014-09-11 18.47.17

I have experimented in the past with hot water canning this giardiniera to preserve it for months.  This is a little risky as I do not have a recipe for timing the cooking or canning of this recipe to kill of all the bacteria, so I do not feel comfortable sharing a method at this time.  I suggest keeping the giardiniera in the fridge and using it up in a few weeks to a month.  The vinegar is preserving to allow the vegetables to stay fresh in the fridge for quite a while.

The oil you use should be picked based on flavor, so pick a high quality.  Know that the oil will solidify slightly in the fridge, so let it sit out a few minutes before eating.  If you want to lighten up the recipe a little, I would suggest using a grape seed or avocado oil in place of olive oil.  The recipe makes a significant amount, 6-8 pints, based on how quickly you will consume it may be wise to plan to share or half the recipe below.

2014-09-07 16.08.13

Ingredients:

2 green bell peppers, diced
2 red bell peppers, diced
8 fresh jalepenos, sliced
1-2 other hot peppers of choice
3 large celery stalks, sliced
3 medium carrots, diced
1 large onion, chopped
2 cups fresh cauliflower florets, diced small
1/2 cup salt
water to cover
2-3 cloves garlic, freshly minced
1 tbsp dried oregano, heaping
1 tsp red pepper flakes
1/2 tsp black pepper
1-5oz jar green olives, sliced (if desired)
1 C white vinegar (pickling or white wine)
1 C olive oil (or avocado or grape seed oil work well also)

Directions:

  1. Place the prepared peppers, celery, carrots, onion, and cauliflower into a large bowl that is able to be sealed or covered.  Stir in salt and fill with cold water until vegetables are covered.  Cover bowl and place in fridge overnight.2014-09-07 17.07.16
  2. The next day, drain salty water and rinse vegetables well.
  3. In a bowl mix garlic, oregano, red pepper flakes, black pepper and olives.  Pour in vinegar and oil, mix well to combine with vegetables. 2014-09-08 19.40.58
  4. Cover and refrigerate for 2 days before use.

I typically package the giardiniera into pint or cup sized mason jars immediately after mixing, however you can return mixture to the original large bowl and seal in the fridge for 2 days before distributing into easier to manage jars or containers.

2014-09-10 20.01.35

Enjoy!

Heirloom Tomato Simple Side

2014-09-07 10.59.31

Heirloom tomatoes are about to be finished for the season, but if you can get your hands on one I would highly recommend it.  A good tomato can stand alone on my plate, but sometimes it is nice to dress it up a little.  For a simple side we have been eating this summer I slice the tomato into big slices and dress it up a little.  It doesn’t get much easier or healthier.

I love the way basil matches with tomatoes, but don’t feel like you have to stop there.  I love chives when serving with a savory breakfast as pictured above or parsley when accompanying a sandwich.

Ingredients:

-1 heirloom tomato sliced thick
-1 Tbsp of good quality olive oil
-dash of Kosher salt
-1 Tbsp of fresh herbs roughly chopped or torn

Directions:

Arrange tomato slices on a plate and drizzle with olive oil.  Next sprinkle with herbs and kosher salt…done!

2014-09-07 10.41.01

2014-09-07 10.44.02

Quick Pickled Corn on the Cob

2013-07-08 16.51.09

Pickled corn on the cob has become a summertime favorite at our house.  With corn in season it’s the best time to make this side.  I first made it from a recipe from Martha Stewart’s Real Simple magazine when we were eating fresh oysters at home.  I wanted to make something fresh and tangy that would stand up well and pair with the most delicious oysters in the world, Island Creek Oysters!

IMG_4092

This recipe is easy and I have added other vegetables to the mix over my times making it.  Some of my favorite additions are cauliflower, carrots, garlic, celery and fennel.

2014-07-01 22.00.03

You want to make this 2 days before you plan on serving it, and eat it within one week of making for the best results.  The chili peppers give a little kick, you can add more or less based on your preference.  I usually add an extra bay leaf or two as well for a little extra spice.  The vegetables are fantastic on their own, but I highly recommend adding the red onions to burgers, sandwiches, and fish tacos.  The sliced corn is great as well in the fish tacos, salads, or with fresh cilantro and tomatoes for a quick salsa.

Ingredients: 

4 ½ cups cider vinegar
6 cups water
¾ cups Sugar
¼ cup coarse salt
1 dried bay leaf
7 red Thai chilies, 3 split open
8 large ears of corn, shucked and cut into 1.5″ medallions
1 large red onion, thinly sliced

Directions:

1. Bring vinegar, water, sugar, salt and bay leaf to a boil making sure sugar dissolves.  Stir in chilies and let cool about 10 minutes until warm.

2014-07-01 21.48.12

2. Cut and prepare corn and onion (or whatever vegetables you want to use) and layer in jar or bowl.

2014-07-01 21.44.22

3. Pour warm vinegar mixture over corn and onion and cover completely leaving jar open for an hour or two to cool before closing and putting in refrigerator for at least 1-2 days.

Serve cold and enjoy!


Kohlrabi Salad

2014-06-29 15.46.43

If you have ventured through the farmers markets lately or joined a CSA, you are probably looking at a few bulbs of Kohlrabi to use up.  The first time I tried kohlrabi I grilled it with onions, garlic, salt and pepper.  It turned out good but nothing to rave over.  My friend suggested just eating the slices raw with olive oil and salt/pepper to taste.  She was right, raw is the way to go with this.  The flavor is similar to broccoli stem or cabbage, but more delicate.  This simple salad uses up these strange looking orbs in a fresh way.  I didn’t fully skin the bulbs before thinly slicing, but I did scale down some of the thicker portions of the skin to avoid any woody or tough pieces in the salad.  The leafy greens are edible too, I plan to pulverize those in my morning smoothie.

2014-06-29 15.05.55

Ingredients:

1-2 bulbs of kohlrabi cleaned and sliced thin
1/2 red onion, diced
1 handful of fresh herbs (I went with parsley and thyme)
1-2 Tbsp of good quality olive oil
Generous dashes of salt and pepper to taste

Directions:

1. Slice the kohlrabi, onion, and herbs.  Mix in a large bowl with olive oil and salt/pepper until evenly coated.

Note: If you want to take it up a notch, some crumbled feta and bacon would be delicious mixed in as well.

Dill Potato Salad

2014-06-24 18.16.36

Summer is all about salads, and potato salad is no exception to the list.  While I love a healthy and fresh salad devoid of cheese and creamy dressing, sometimes a little creamy potato salad is just what the meal needs.  Especially when you are serving a main course straight off the grill.  I have an abundance of dill left over from our CSA this weekend and I needed a side to bring to dinner tomorrow night.  Potato salad is the best crowd pleaser I could come up with.  I started with a simple base and a combination of yukon and red potatoes to make this creamy and tangy masterpiece.  With the 4th of July coming up, I would recommend this as an easy and cost effective side.

Ingredients: 

3-4 medium size red skin potatoes
2 medium size yukon or golden potatoes
1/2 cup of mayonnaise
2-3 Tbsp light cream
1/4 cup of red onion, diced
1/4 cup of green onion, sliced green and white pieces
1/4 cup of dill, minced
1 Tbsp lemon juice
salt and pepper to taste

Directions: 

1. Bring the potatoes to a boil, whole, let boil for 10 minutes.  Remove from heat and allow to sit for 5-10 more minutes until just fork tender but not completely cooked.

2. In a bowl combine mayonnaise, cream, red and green onion, dill, lemon juice and salt and pepper to taste.

3. Drain and dice potatoes into 1-1 1/2 inch cubes based on preference.  Allow to cool and mix with mayonnaise mixture.  Serve that day or refrigerate for up to 2 days.

2014-06-24 18.12.23

Note: You may want to change out the dill for another herb of choice, but I think the dill is perfect.  You can also add some diced bacon for a meat lovers option, I think this is called German Style.  If you notice the potatoes absorb all the moisture on day 2, make up a little more mayo mix and add to potatoes.

Enjoy!

Tangy Herb Vinaigrette

2014-06-22 19.04.51 Our summer CSA has been full of greens for salads, which means I was in the market for a new dressing to spice things up a bit.  This dressing is tangy and using the Vitamix makes it smooth and creamy without adding any dairy.  I adapted this vinaigrette from a recipe for pasta salad, but it pairs well with a classic summer salad topped with fish, chicken, or just veggies.

2014-06-22 18.59.51

Ingredients: 

1/4 cup of Avocado oil or another vegetable oil
1/4 cup of olive oil
1/3 cup of red wine vinegar
1 Tbsp dijon mustard
2 Tbsp chopped parsley
1 Tbsp of chopped dill
1 clove of garlic
dash of salt and pepper to taste

Directions: 

1. Add everything to the Vitamix and blend increasing to high until smooth and creamy.

2014-06-22 19.10.27

I used fresh parsley and dill, however I am looking forward to trying out other herbs to change the flavor profile: basil, thyme, cilantro, oregano, chives or whatever you are growing in abundance.

Enjoy and Eat Well!

Lemon Rainbow Chard

2014-06-01 18.12.54

This summer we have opted to join a crop share to see what all the fuss is about.  You know, supporting local farmers, eating fresh, choosing organic, and my favorite part which is eating what is in season.  We are proud to have chosen Genesis Growers Farms (www.genesis-growers.com) with our pickup at the Saturday morning Green City Market.  Along with the medium size box of farmer’s choice fruit, produce, and herbs we have also elected to get 1 dozen eggs.  So far I have to say the eggs are my favorite thing.  The taste of fresh eggs over store bought is almost criminal.  Especially for me who would put an egg on anything.  In our first box we got some Rainbow Chard that was just beautiful.  Interestingly enough I have never bought chard before, so I needed to do a little research before making a dish.

2014-05-31 10.36.10-1

Chard is in the same family as beats and is similar to kale and spinach in flavor/cooking options.  Typically chard is cooked to soften some of the bitter flavor of the greens, but can be eaten raw.  I found the greens to be more flavorful than spinach when cooked and softer than kale.  Chard is a nutritious little green to add to your life, rich in vitamins A, K, and C as well as a minerals, dietary fiber, and protein (according to Wikipedia).

A lot of the recipes I looked at sauteed the chard with lemon or garlic, and quite a few used fresh ginger.   This got me thinking, as I have a robust amount of lemon thyme already growing in my “garden” I went the lemon and garlic route.

2014-06-01 18.00.07

Ingredients:

– 1 large bunch of Rainbow Chard (stems and greens separated and diced)
– 1-2 cloves of Garlic, minced
– 1 Tbsp of fresh Lemon Thyme with center stem removed, use regular time if you don’t have lemon thyme
-1/4 tsp of red pepper flakes (optional)
– 1-2 Tbsp Olive Oil, or sauteing oil of choice
– 1/4 to 1/2 Lemon, juice

Directions:

1. Cut the chard stems into 1/2 to 1/4 inch pieces, separated from the greens.

2. In a heavy skillet on medium heat, saute the chard stems in olive oil with the garlic, half of the lemon thyme, and red pepper flakes.

2014-06-01 18.05.56

3. Allow to cook for 3-4 minutes until stems are soft and fragrant.

4. Add the diced chard greens to the pan and stir in.  Cover and cook for 5 more minutes, stirring as needed.

2014-06-01 18.08.44

5. Spritz with fresh Lemon, garnish with remaining lemon thyme, and serve hot.

Enjoy and Eat Local!

Vitamix Skills: Coleslaw

Since purchasing my Vitamix blender I find that I am always searching for ways use it that are out of the ordinary.  When my friend told me about chopping cabbage in the Vitamix I thought it was an urban legend.  How could the Vitamix roughly chop, doesn’t it just pulverize?  It has been months since I have had the blender and for as much as I love coleslaw I haven’t yet tried to shred cabbage. Tonight was the night to experiment.

2014-05-15 19.43.42

It took me several rounds to figure out exactly how to make this work, but I think I finally found the best setup for a restaurant quality chop.  It’s not that cabbage is hard to chop, but it is time consuming and it’s so tempting to buy the bag of shredded mix.  Save yourself the money and add some freshness to your life by shredding yourself.

Step 1:

Take a small wedge or two of cabbage and place in Vitamix.  Fill with water to the point that the wedge floats just above the blades.

2014-05-15 19.38.53

Step 2:

Turn the blender on and increase to level 4 quickly, let run for under 10 seconds.

Step 3:

Pour into mesh strainer to separate from water.

2014-05-15 19.42.08

Blend in batches for desired amount.  Don’t forget to check out side dishes for my summer coleslaw recipe: https://seasonsforcooking.com/2013/09/01/summer-bbq-coleslaw/

Snacking Nuts

The holiday season is full of gatherings with friends.  I made this snack mix to put out while having a drink before going out to dinner.  I didn’t want everyone to fill up, but there is something nice about having a small snack with your beverage.  This is easy and will last in an air-tight container for up to 2 weeks, so you can cover Christmas and New Years with one baking.  This would also make for a nice host/hostess gift with a bottle of wine or box of chocolates.

2013-12-22 12.08.30

I found this recipe on the Food and Wine website, perfect amount of sweet and savory without overbearing the natural nut flavors.

Ingredients:

2 cups almonds
2 cups pecans
2 cups walnuts
1/4 cup of pure maple syrup (heaping)
2 Tbsp of fresh chopped rosemary and thyme
2 Tbsp extra-virgin olive oil
1/4 tsp cayenne pepper (heaping)
salt and fresh ground pepper

Directions:

1. Preheat oven to 350.
2. Toss to combine all ingredients except the salt and pepper in a large bowl.

2013-12-21 14.56.20
3. Spread out mixture on a cookie sheet and bake for 15 minutes, stirring once or twice.
4. When you remove them from the oven sprinkle with salt and pepper to taste and stir 1-2 more times while cooling.

2013-12-21 14.57.57Enjoy!

Roasted Sweet Momma Squash

2013-10-27 19.52.56

Sometimes a side calls for a flair of sweet instead of savory.  Today I made a marinated pork tenderloin and decided it was just the dish for a little touch of sweetness.  I found an adorable squash at the farmers market last month, and as the season goes on I have decided to remove it from the decoration basket to serve for dinner.  It is called a sweet momma squash, looks like a larger and more plump acorn squash…unfortunately I did not take a picture before cutting it.  It tastes similar to acorn squash and has the same texture qualities.

Ingredients:

1 sweet momma squash (or acorn squash)
2 Tbsp  brown sugar
1 Tbsp melted butter
1 Tbsp coconut milk

2013-10-27 19.22.44

Directions:

1. Cut squash in half and remove seeds.  Slice into wedges 1-2 inches thick.

2. Spray lightly with olive oil and roast for 10 minutes in the oven at 400 F.

3. Remove from oven and coat with mixture of brown sugar, melted butter, and coconut milk on both cut sides.  Return to oven and roast for another 10-15 minutes until tender.

2013-10-27 19.52.56


The skins of the squash got really tender so I ate the whole thing.  If the skins don’t get soft enough or it weirds you out too much, just go for the fleshy center .

Enjoy!

Vegetarian Squash Boats

2013-10-08 21.46.35

On my way home from a Fall weekend with my girlfriends, I found what appeared to be the worlds largest zucchini at a farmer’s stand in Wisconsin .  When I went to cut into it I was surprised to find out it was not a zucchini, but some sort of squash as it was hard and had a pumpkin-ish smell.  I did some research and I think what I had was actually a squash called Mo Qua.  My game plan completely changed with this discovery, I decided to make a roasted stuffed squash instead of grilled zucchini rings.  Usually I stuff squash with meatballs, pretty much the only way to get my husband to eat acorn squash, but I didn’t have any ground meat on hand so I made this veggie mixture instead.  Turned out to be amazing, sliced and served with salmon to complete the meal.  This stuffing will work in any squash, usually I prefer butternut or acorn squash for stuffing.

Stuffing Ingredients:

– 1/2 onion, diced
– 1 green pepper, diced
– 1 clove garlic, minced
– 1 Tbsp fresh thyme, center stem removed
– 1 Tbsp fresh basil, roughly chopped
– 1 large tomato, diced
– 1/8 cup sliced kalamata olives
– 1/4 cup Parmesan cheese
– 1/4 cup bread crumbs
– 1/2 tsp red pepper flakes
– salt and pepper to taste

Directions:

1. On a baking sheet roast the squash of choice by cutting in half, removing seeds, spraying with olive oil, and seasoning with salt and pepper.  Roast in the oven at 350 for 40-60 minutes, until pierced easily with a fork.  For a harder squash (butternut or spaghetti) , poke it with a fork throughout and put in the microwave for 5-7 minutes to soften up enough to easily cut in half.

2013-10-08 20.55.32

2. Make stuffing by sauteing onion, pepper, garlic, red pepper flakes, thyme, salt and pepper in a skillet over medium-high heat with olive oil.  Saute for 10 minutes on medium heat before stirring in the diced tomatoes, olives, and fresh basil.  Stir and cook for 5 minutes before gently folding in the Parmesan cheese and bread crumbs.  Mixture should be soft and cohesive, if it is too wet add more bread and Parmesan, don’t over mix.

2013-10-08 20.55.40

3. When your squash are roasted remove from oven and carefully stuff with stuffing.  Return to oven and roast at 350 for 10 minutes or until stuffing looks a little browned.

2013-10-08 21.12.40Enjoy!

Roasted Garlic Red Skin Mashed Potatoes

No Fall or Winter feast is complete without mashed potatoes.  Ever since I was a kid I have been a mashed potato snob, I always demanded the real thing, none of that boxed stuff.  While I love classic mashed potatoes, I can’t help but try to enhance it.  I recently gained a new appreciation for roasted garlic, the flavor is soft yet powerful at the same time.  If roasting garlic seems frivolous or too time consuming, try popping a few cloves in the oven with a main dish to roast for sides (such as this one) or smearing on bread.  The process is totally worth the effort in my opinion.

2013-09-29 17.53.36

Ingredients:

– 2 lbs of red skin potatoes, diced evenly

– 1/4 stick of butter (or more to taste)

– 2 Tbsp fresh chives, roughly chopped

– 1/4 cup of milk (more or less for consistency)

– 1/4 cup of sour cream or plain greek yogurt.

– 3-4 cloves of garlic, roasted and mashed

– salt and pepper to taste

Directions:

1. Roast the garlic:  Cut the top off of the cloves leaving skin intact, drizzle with olive oil and sprinkle with salt and pepper.  Loosely wrap in foil and roast in oven at 325-350 for 45-60 minutes.  I stuck this little foil pouch in with the ham while it was cooking to save time.  To prepare garlic for mixing, remove roasted cloves from oven and push pulp out of skin and mash with a fork or knife.

2. Prepare your potatoes and cover with cold salted water, bring to a boil and cook until fork tender.  Try to not overcook.

3. When the potatoes are cooked, drain water and mix with remaining ingredients in standing mixer or hand mixer, take care to not over work.

2013-09-29 17.40.37

Enjoy!


Roasted Carrots and Fennel

Easy but healthy sides are an important part to every meal.  Roasted vegetables are a great part of winter weather cooking when grilling is not an option.  For tonight’s meal I kept it simple, and the fresh garlic and ginger make it taste like a much more complicated side than it really is.

2013-09-26 20.12.09

Ingredients:

– 6 carrots

– 1/2 bulb of fennel

– 3 cloves of garlic

– 1 Tbsp ginger sliced

– grape seed oil

– salt and pepper

2013-09-26 19.23.42Directions:

1. Slice carrots and fennel, mix together with garlic and ginger.

2. Drizzle with grape seed oil and season with salt and pepper to taste.

3. Spread out on cookie sheet and roast in oven for 15 minutes at 350, then mix and turn temp up to 450 to finish roasting about 10 more minutes or until fork tender.

Enjoy!

Baked Corn

I’m not exactly sure how to classify this side dish, other than call it what my family calls it…baked corn.  It’s not a corn bread, but it’s not a casserole either…it’s baked corn.  Usually we have this for thanksgiving, but I decided to make it to go with the chili, adding some jalapenos added to spice it up.

2013-09-08 19.32.14


Ingredients:

– 1 box jiffy corn muffin mix

– 1 cup sour cream

-2 eggs

– 1 can whole cream style corn

– 1 can whole kernel corn, drained

– 1 stick butter, melted

-1/4 cup chopped jalapenos from a jar

2013-09-08 19.29.29

Directions:

1. Mix all ingredients together and pour into a buttered casserole dish.  Okay to mix a day ahead of time and refrigerate before cooking.

2. Bake uncovered in oven at 350 for 60 minutes, or until center is cooked with a semi-firm consistency and browned on top.

This is NOT a healthy side dish, rather a special occasion side dish.  I have been toying with the idea of going all out and adding shredded cheddar cheese to it as well.

I find that if I mix it a day ahead of time, it needs at least an hour to warm up before putting it in the oven.  I have also used all sorts of dishes, this is an 8×8 but I have used a 9×11 and even a round pan.  To serve it’s best to scoop it out like a casserole.